
This feature is available only with paid Kochava accounts. Contact us to learn more.
Kochava Cost provides access to daily spend reports across all of your (Kochava Cost-integrated) network partners in one place. Once a configuration has been established with an API-connected (or manual upload) partner and Kochava, Cost will pull and display the daily spend in easy-to-consume graphical representations, or in reports that you can share with your team.
- Easily collect all network partners’ cost data in one location.
- Daily cost is collected up to 7 days later to ensure the most accurate, up-to-date value is being used for calculations.
- Upload cost data manually for non-API-integrated partners .
- Check the integration status and next pull time for all partners quickly in one location.
- Set up email alerts for timely notification of changing configuration status.
- Export all of your cost configurations for a quick review of the settings across partners.
Requirement Measurement Key / Value Pair
We highly recommend checking your Kochava tracking links to ensure that the below keys are included exactly as below. This is necessary for us to join your Cost data to Measurement data.
- partner_campaign_id = the network partner’s campaign ID.
- partner_campaign_name = not required, but is human-readable and useful to have on measurement data.
- creative_Id = required for joining cost to measurement data at the creative level – EITHER the creative_id or creative_name can be passed here, so long as it is available from the network in cost data to join – AND doesn’t change mid-campaign.
Example: partner_campaign_id={partner macro here}
Example: Your links could contain both —
control.kochava.com/v1/cpi/click?campaign_id=12345&cp_2={partner_campaign_id}&partner_campaign_id={partner_campaign_id}
Cost Configuration User Interface
- Log in to Kochava.
- Select the desired Account.
- Select Cost > Configuration.
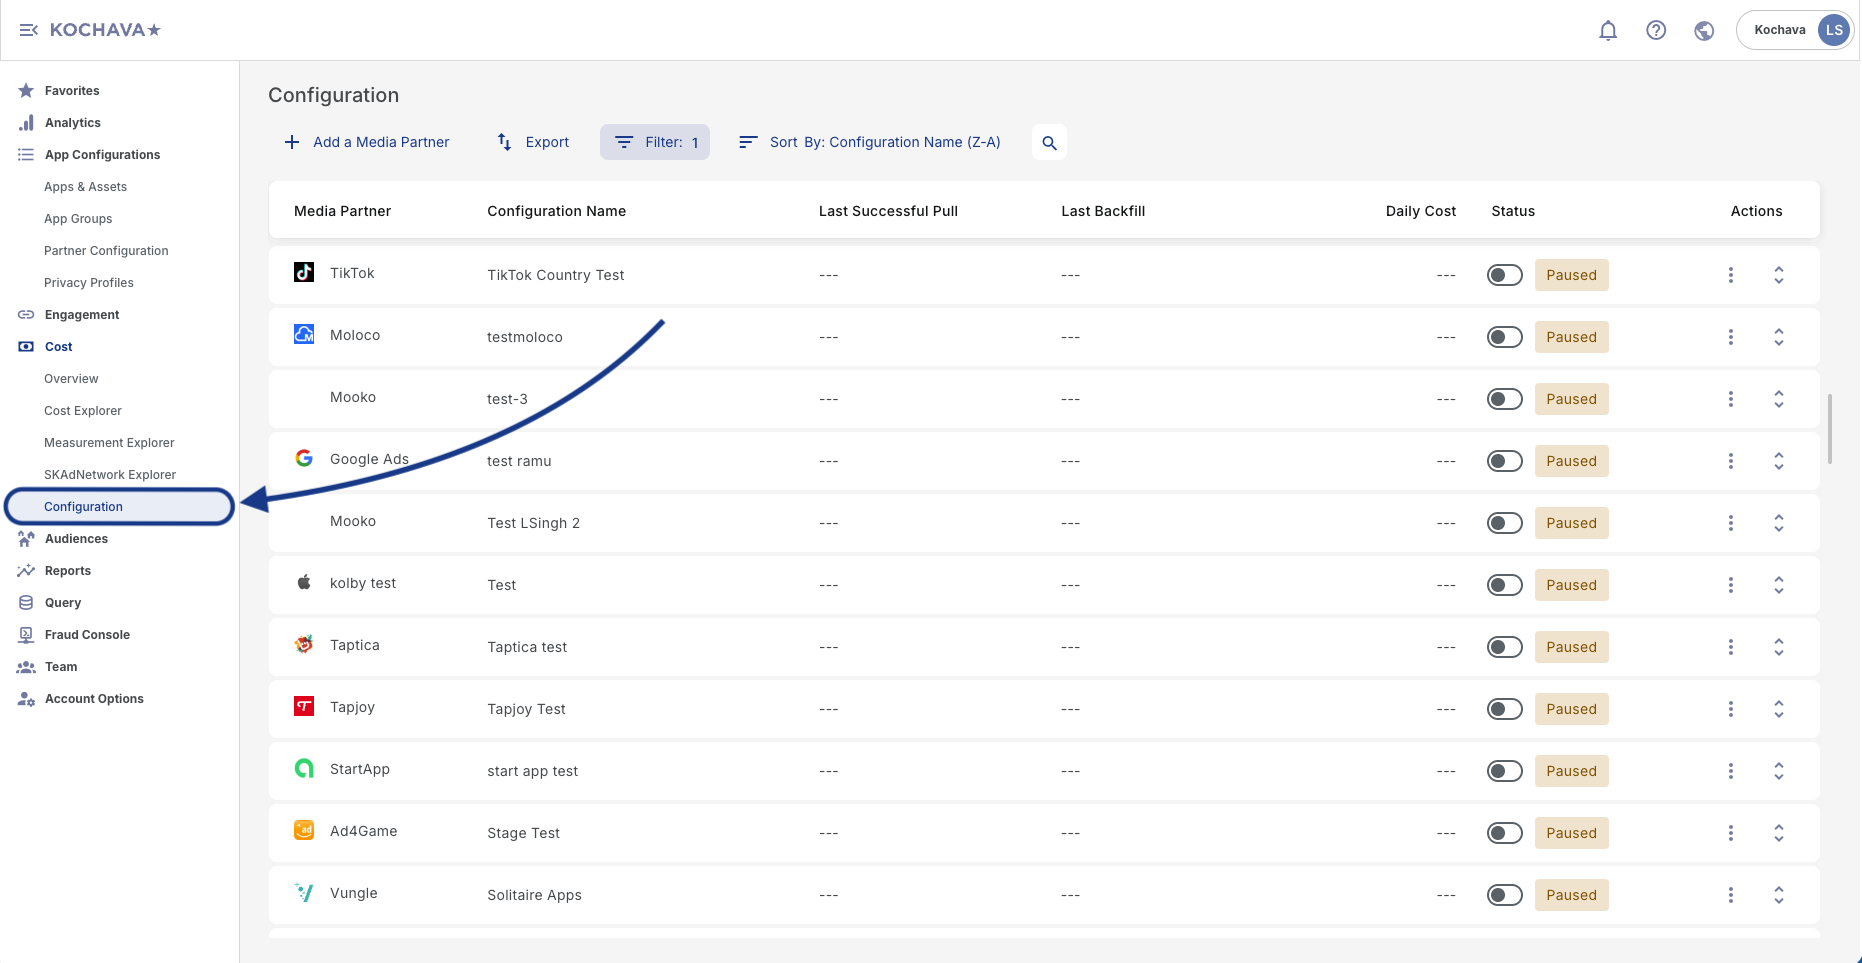
Creating a New Cost Configuration
- Click + Add a Media Partner.
- Select the desired Media Partner.
- Enter a unique Configuration Name.
- Enter any Media Partner specific parameters.
- Select the desired Time Zone.
- Select the desired Currency.
- Add any additional email addresses for Notification.
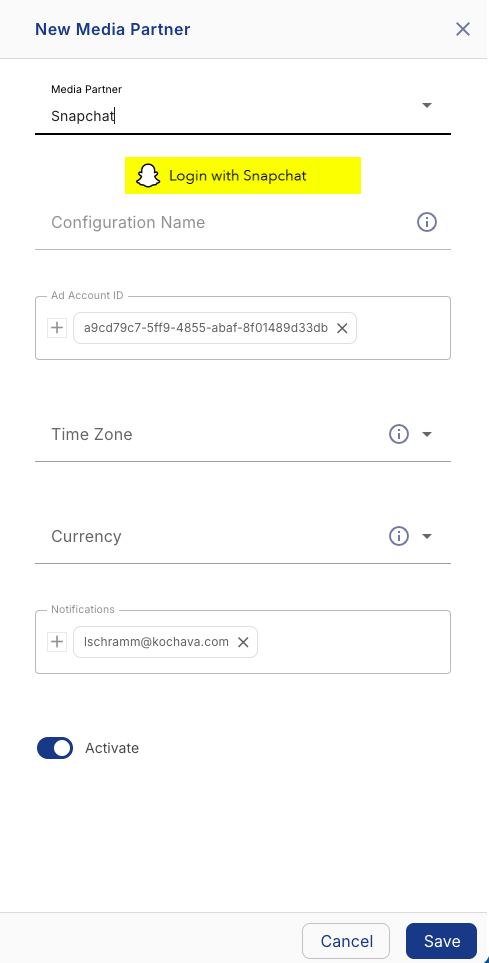
- Activate will be set to On by default.
- Click Save.
Cost Configuration Location and Organization Tools
Cost Configurations can be easily located by utilizing the search and organization tools.
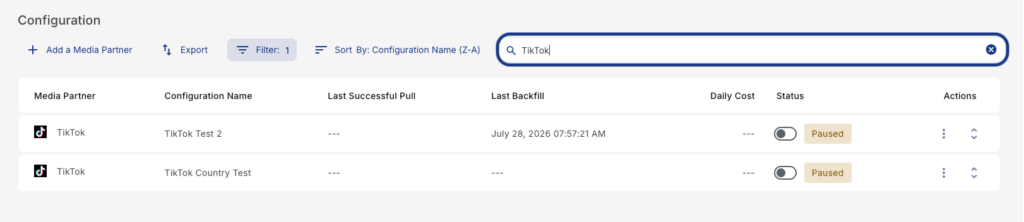
Live Search Tool:
Cost Configurations can be located using the live search tool by typing part or all of the name of a configuration.
Cost Configuration Organization:
Cost Configurations can be organized by using one of the following:
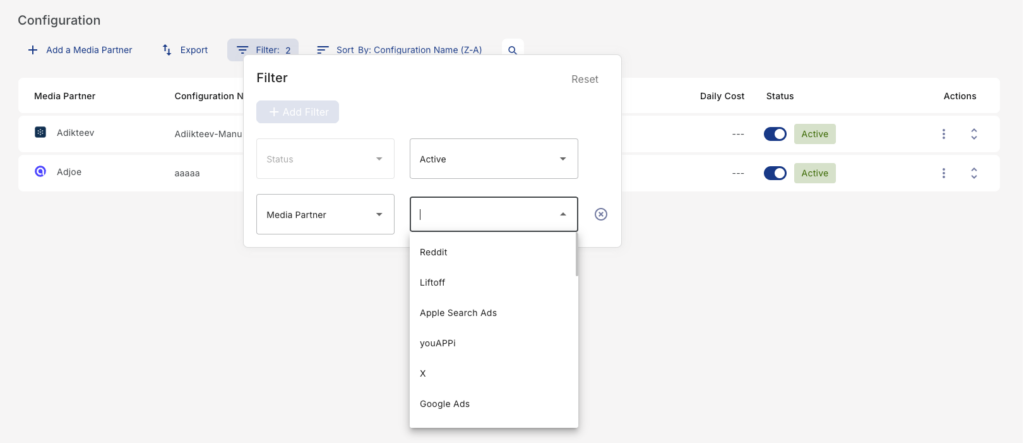
Status Filter —
- Any
- Active
- Failed
- Needs Action
- Partner API Retry
- Paused
Media Partner Filter —
If multiple media partners have been activated, you can organize your Cost Configurations to display only the configurations associated with the desired partner.
Sort —
- Configuration Name (A-Z)
- Configuration Name (Z)-A
- Last Pull Time (Newest)
- Last Pull Time (Oldest)
Cost Configuration List
The Cost Configuration List displays all of the active and configurations that still require attention. The list can be organized and sorted to easily locate any desired configuration.
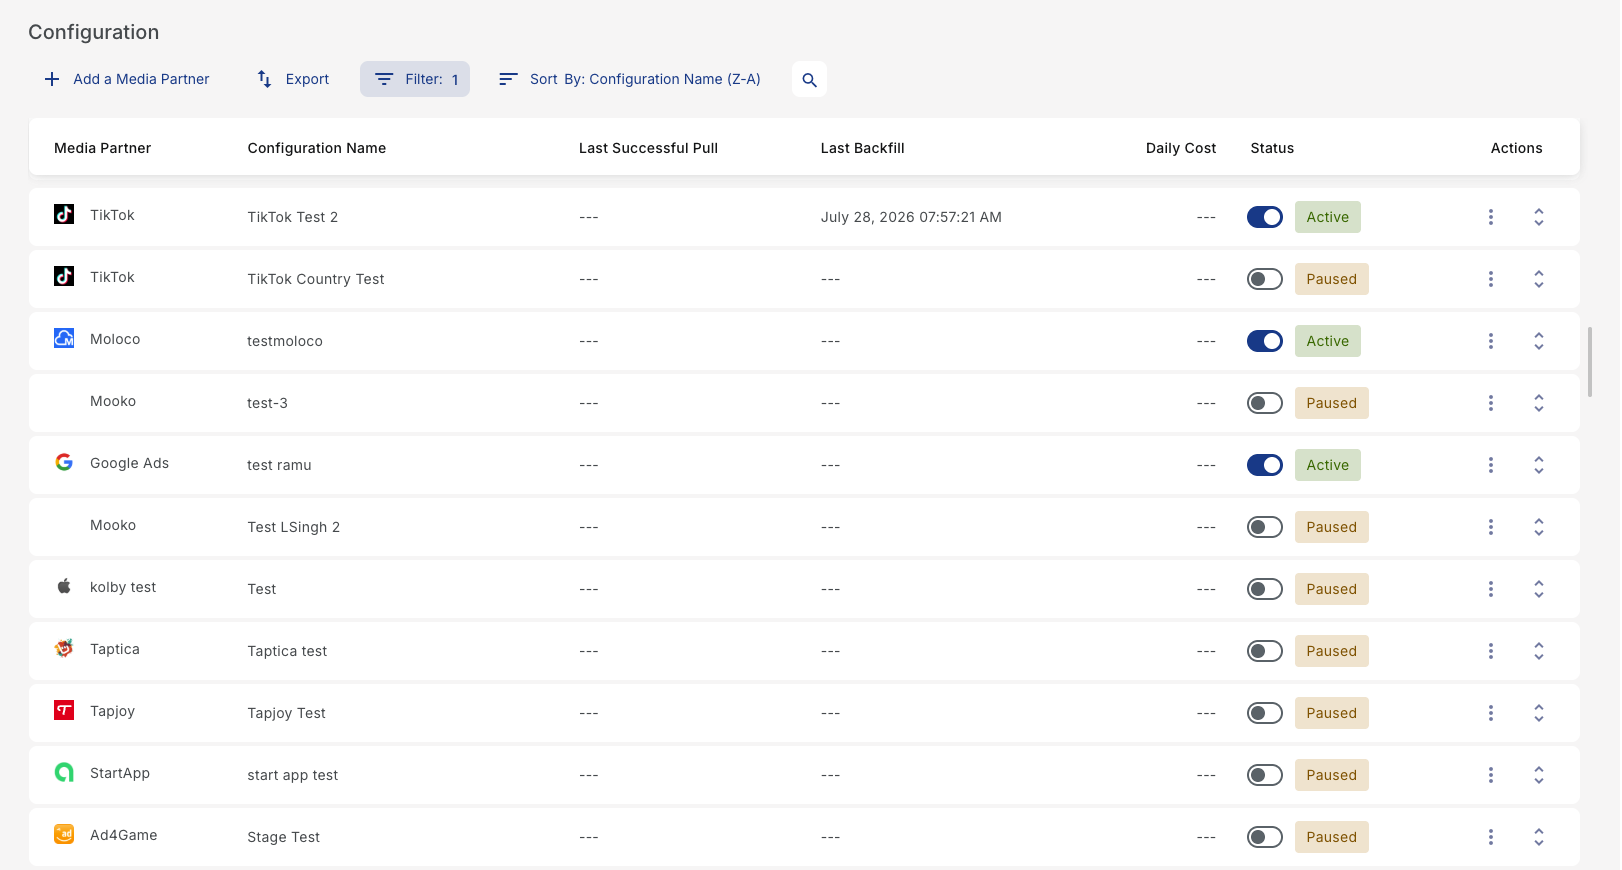
Status:
- Active — The previous day’s job was successful and cost data was pulled for D1, D2, D3, & D7.
- Failed — The job failed due to:
- Unforeseen issue (dev escalation needed) or
- Partner API Retry job failed.
- Needs Action — The previous day’s job failed. There will be a Job ID associated with this status, which can be viewed by clicking the configuration row. Please contact your Client Success Manager and provide that Job ID for troubleshooting. If values need to be adjusted, edit the configuration and save. Upon saving again, Kochava will run the job again at the next interval.
- Partner API Retry — The job failed due to partner API timeout issue (heavier than normal congestion), and our system is retrying the job at a later time. (1 retry only)
- Paused — The configuration’s Activate Toggle is set to OFF. No jobs will attempt to run until the configuration is activated.
Last Pull Time:
Date of last attempted API call made to the Media Partner (e.g., May 13, 2022 05:23:38 PM).
– – – : The previous day’s job has not run due to:
- Status is Active — the configuration was recently established and will run shortly.
- Status is Paused — the configuration was in a paused status when yesterday’s job would have run.
Next Pull Time:
Date of the next attempted API call that will be made to the Media Partner (e.g., May 14, 2022 04:05:00 PM).
Editing Cost Configurations
Once a Cost Configuration has been created, it may be updated or edited.
- Locate the desired Cost Configuration and click Cost Configuration Tools (⋮) > Edit.
- Update any media partner specific fields.
- Update the Time Zone.
- Update the Currency.
- Add/Remove any email addresses for Notifications.
- Click Save.
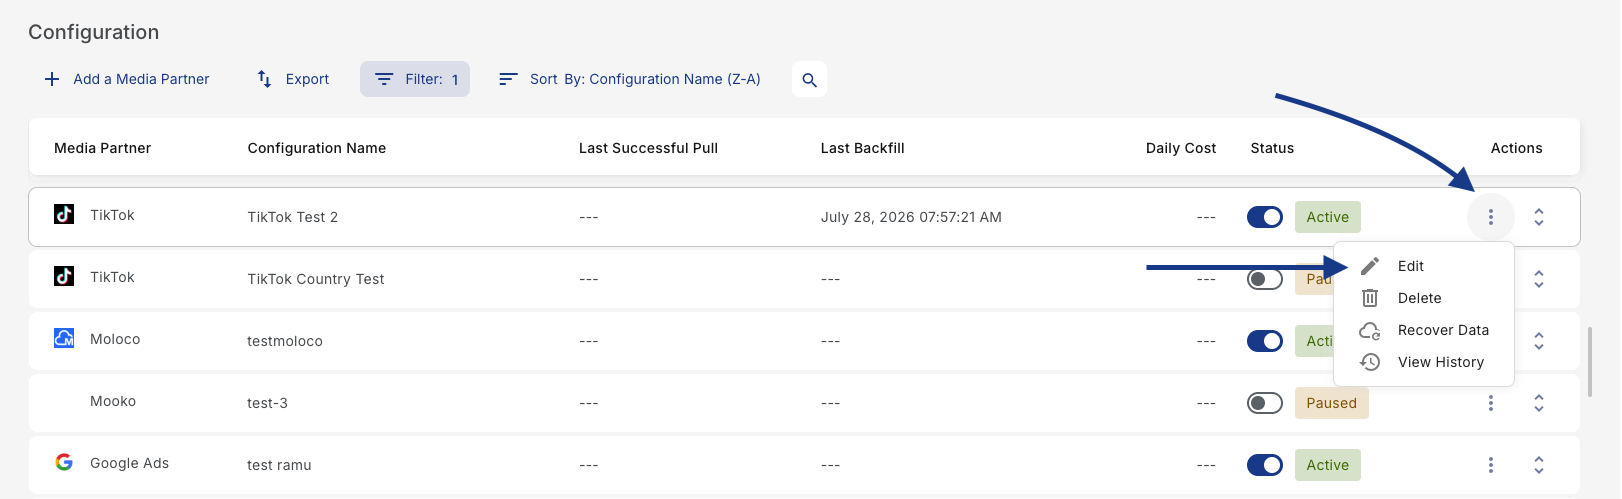
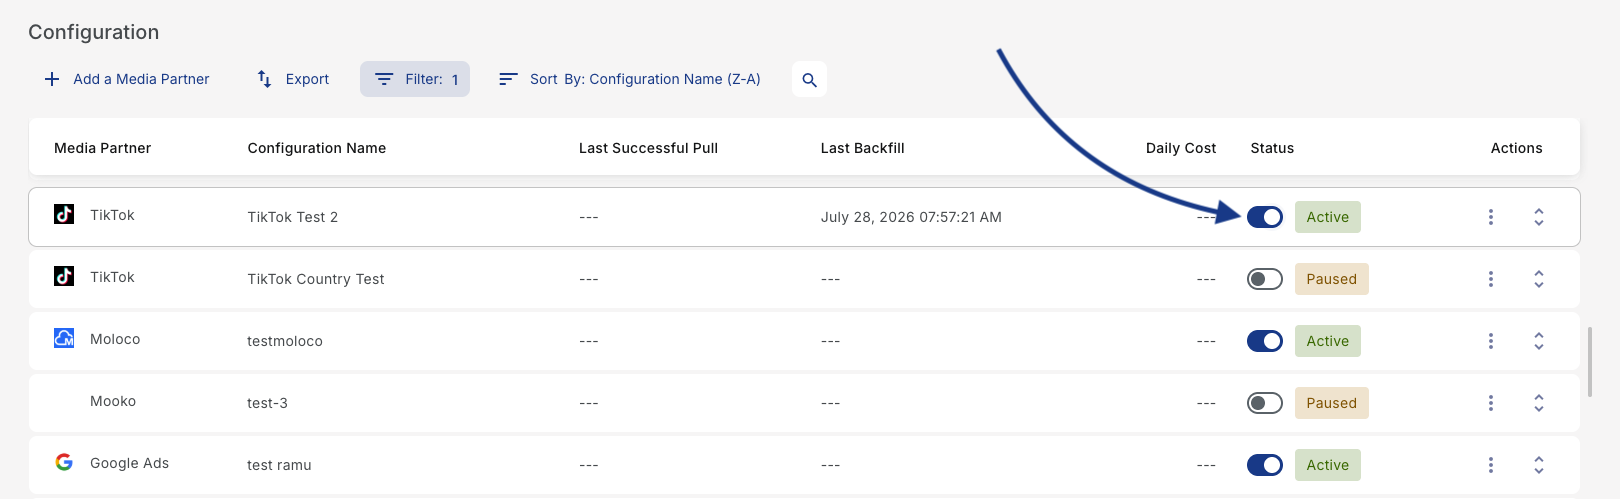
Pausing/Reactivating a Cost Configuration
Cost Configurations may be easily paused and restarted.
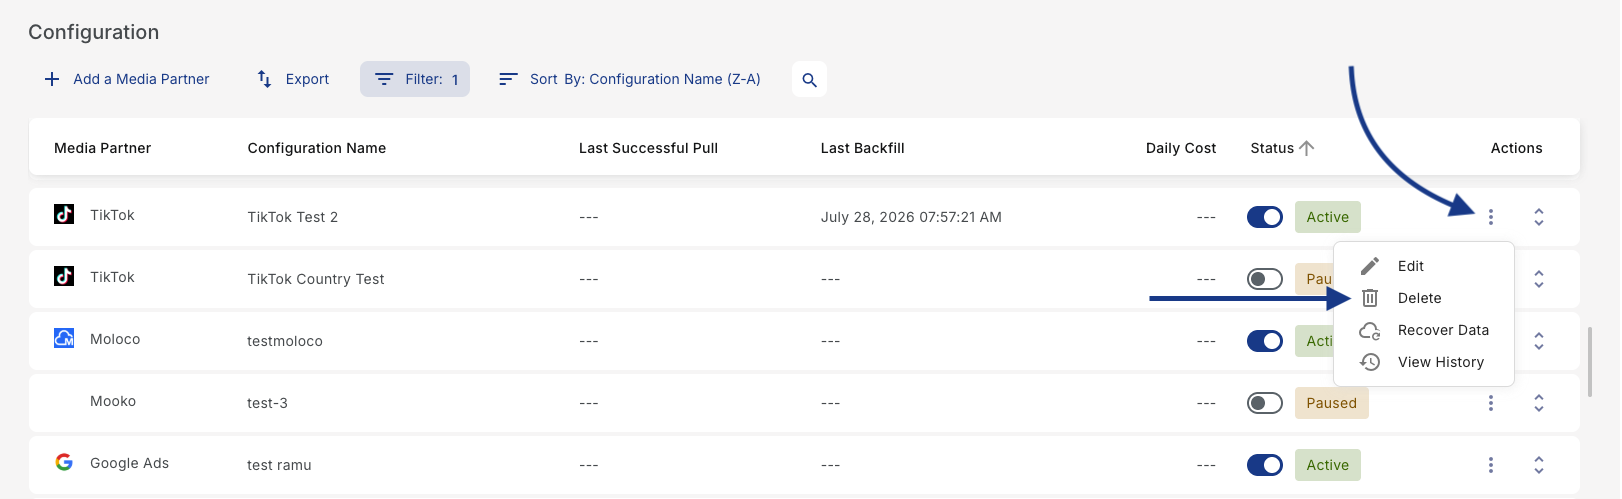
Deleting a Cost Configuration
- Locate the desired Cost Configuration and click Cost Configuration Tools (⋮) > Delete.
- Click Proceed.
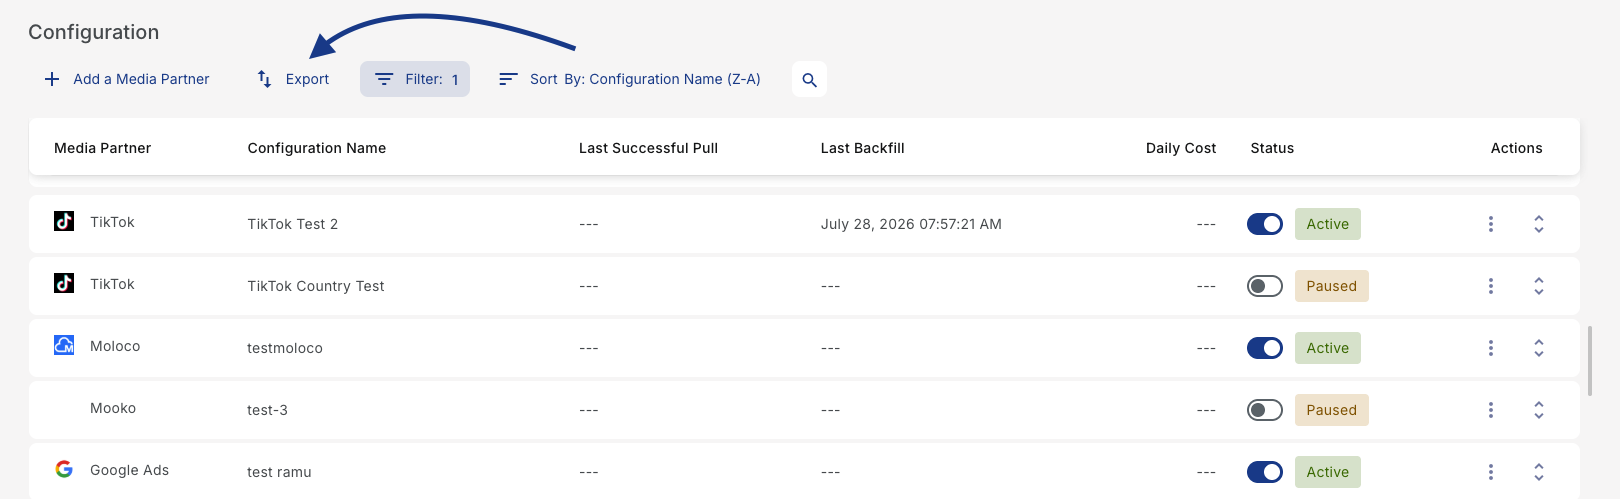
Exporting Cost Configurations
Kochava provides a 1-Click method for exporting your Cost Configurations into a spreadsheet for easy examination.
Cost Data Export Format
| Field | Description |
|---|---|
| If Cost Campaign is active (True), or if the campaign is paused (False). | |
| The Kochava account ID. | |
| The user defined configuration name. | |
| The network partner ID within Kochava. | |
| The network partner name within Kochava. | |
| The user selected timeframe. | |
| The user selected currency. | |
| The frequency that the Cost Configuration will be pulled. | |
| The media partner specific fields for the Cost Configuration. | |
| The next date and time the configuration will be pulled in UTC. | |
| The email addresses that the user defined for notification. | |
| Days that the Cost Configuration will be pulled. | |
| The date and time that the configuration was created. | |
| The date and time that the configuration was last updated. |
Recovering Data
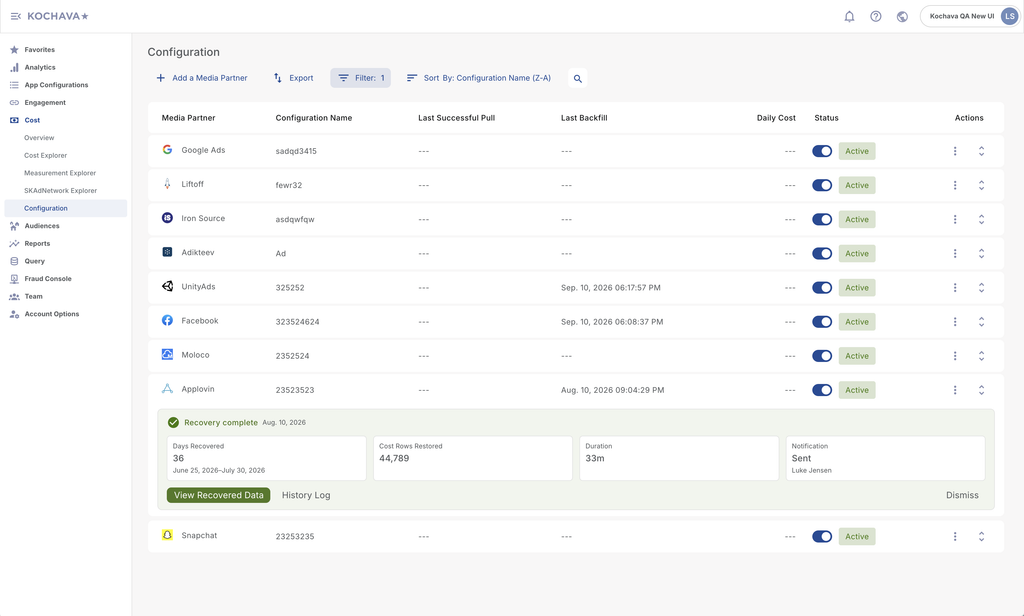
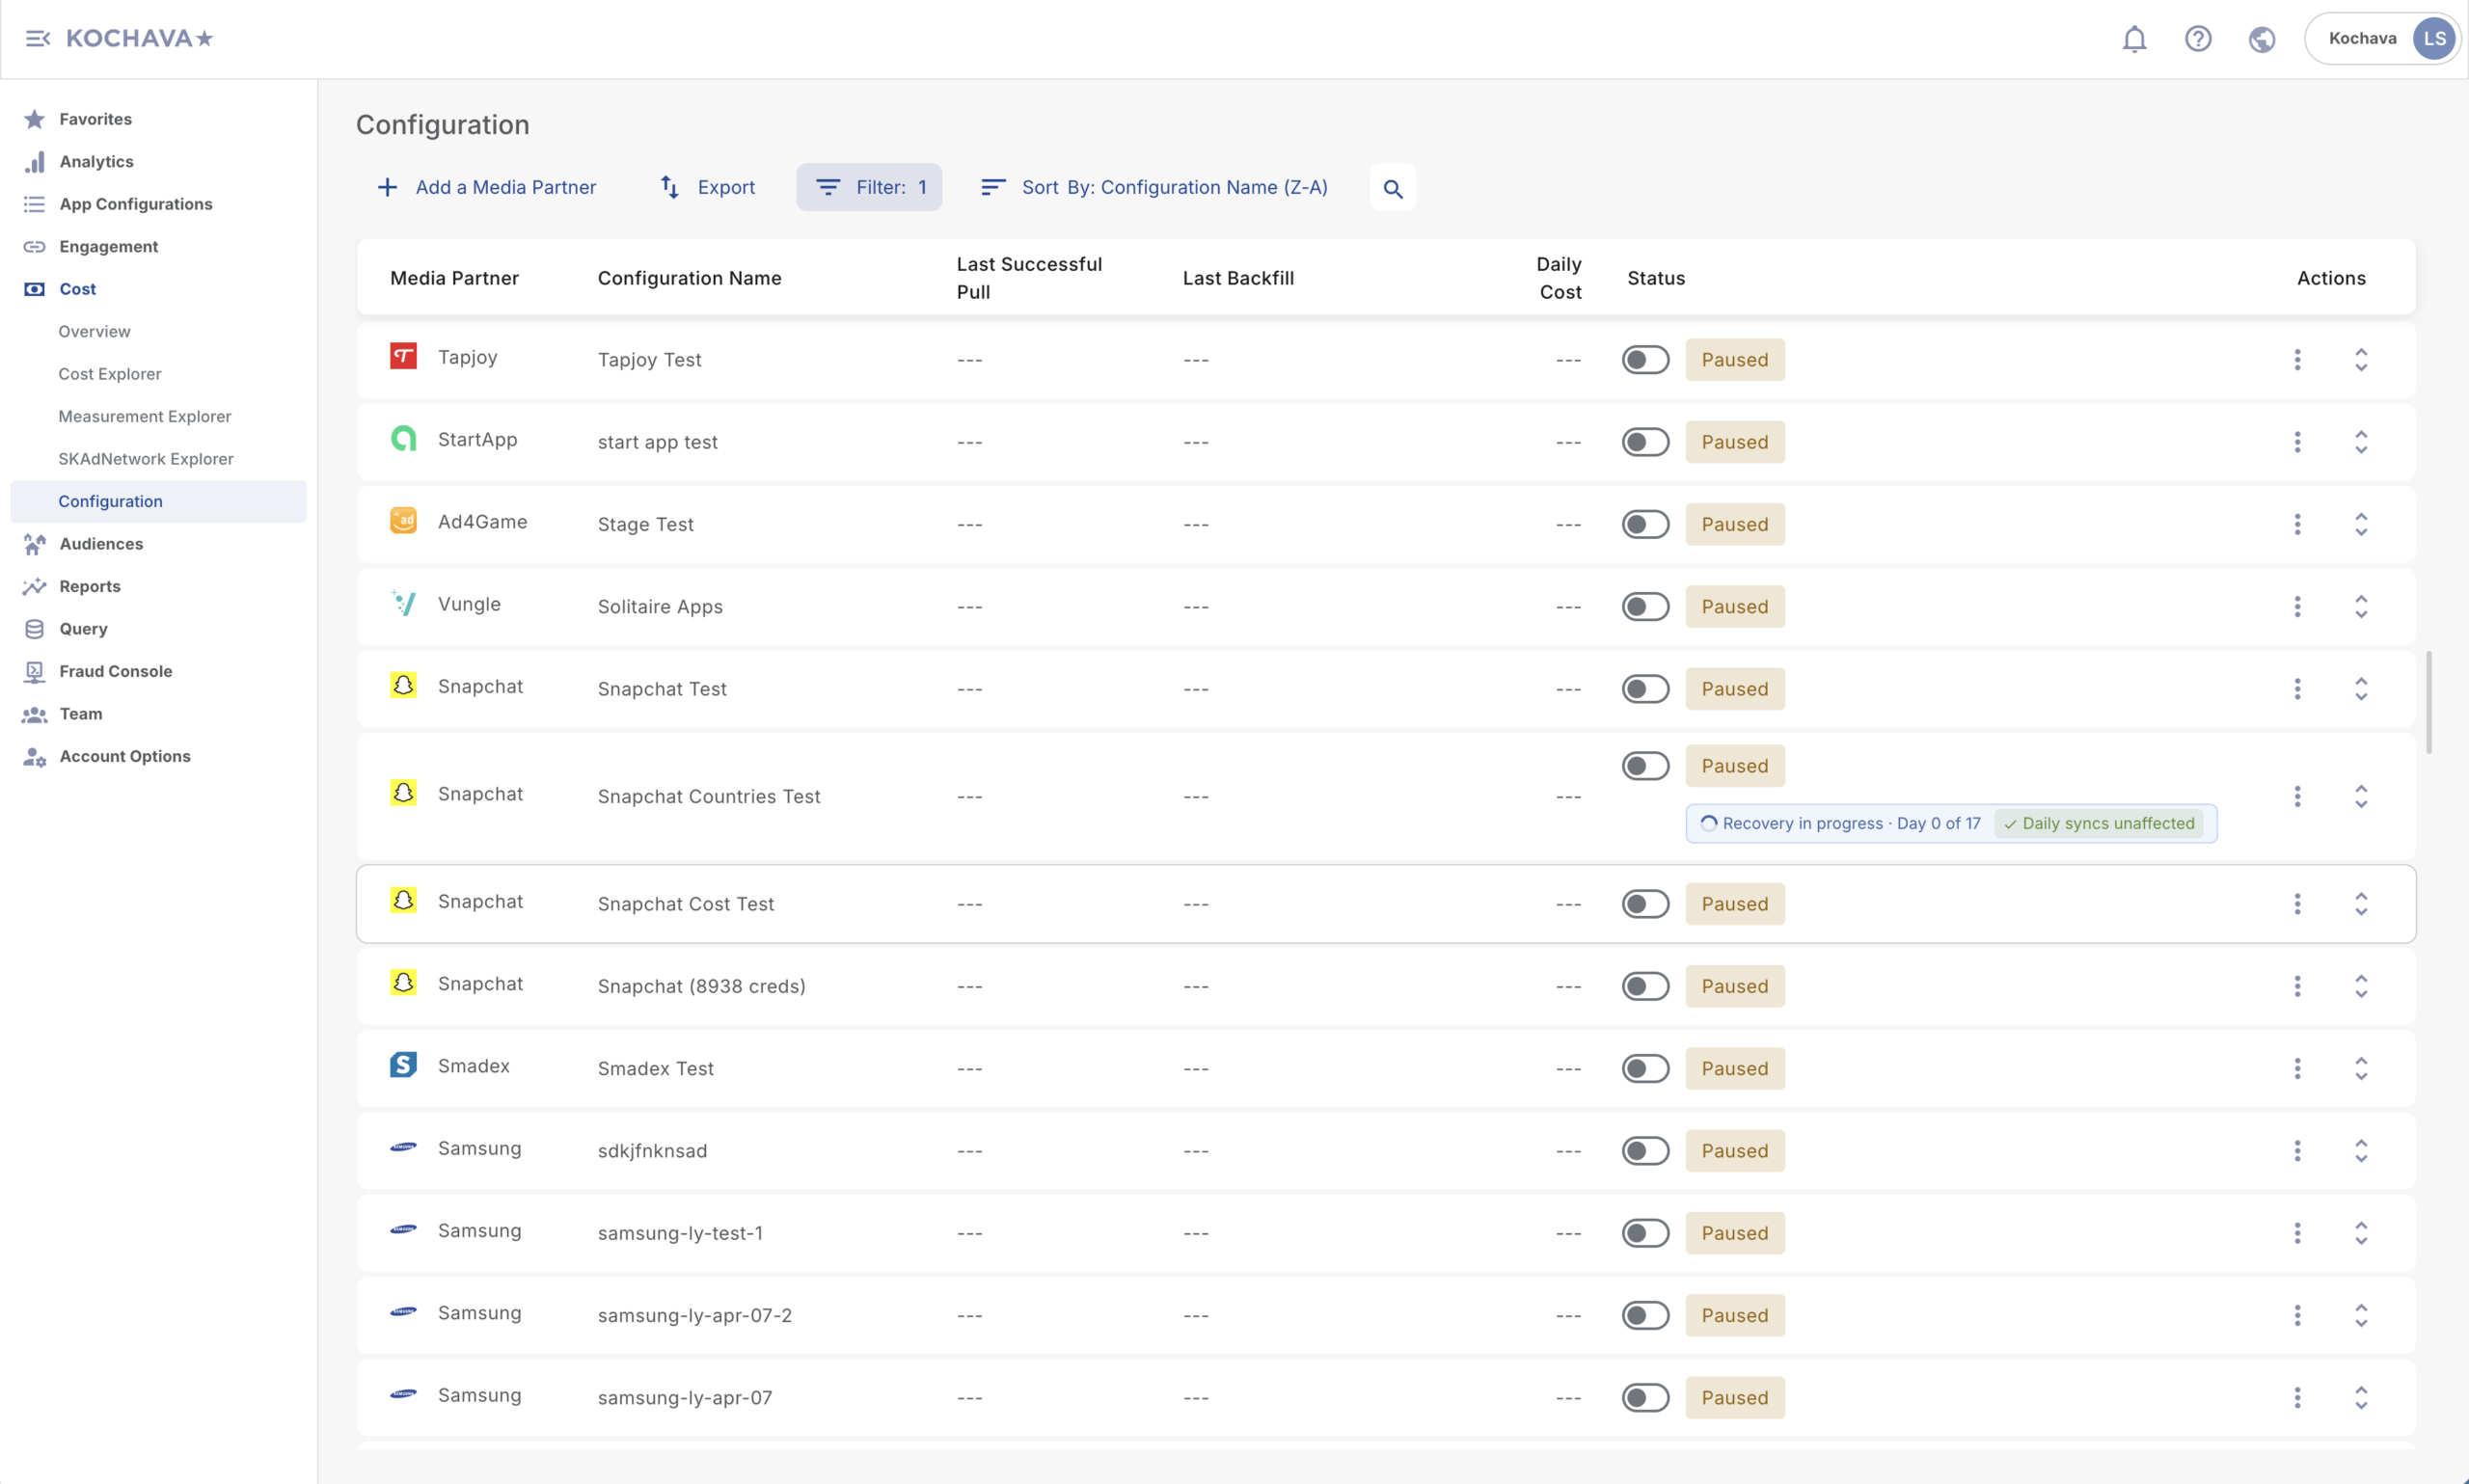
Sometimes a cost integration can fail to deliver data for one or more days — this can happen because of expired network credentials, a temporary network outage, or a misconfigured integration setting. When this happens, the Cost Configuration page gives you a self-serve way to recover that missing data, without needing to file a support ticket.
Cost Data Recovery works for any supported API-based ad network integration, for any date within that network’s data retention window (up to a maximum of one year back from today).
Starting a Recovery Manually
Use this method any time you notice a gap in your own reporting, or want to proactively recover older data.
- Navigate to the Cost Configuration page.
- Locate the row for the integration with missing data.
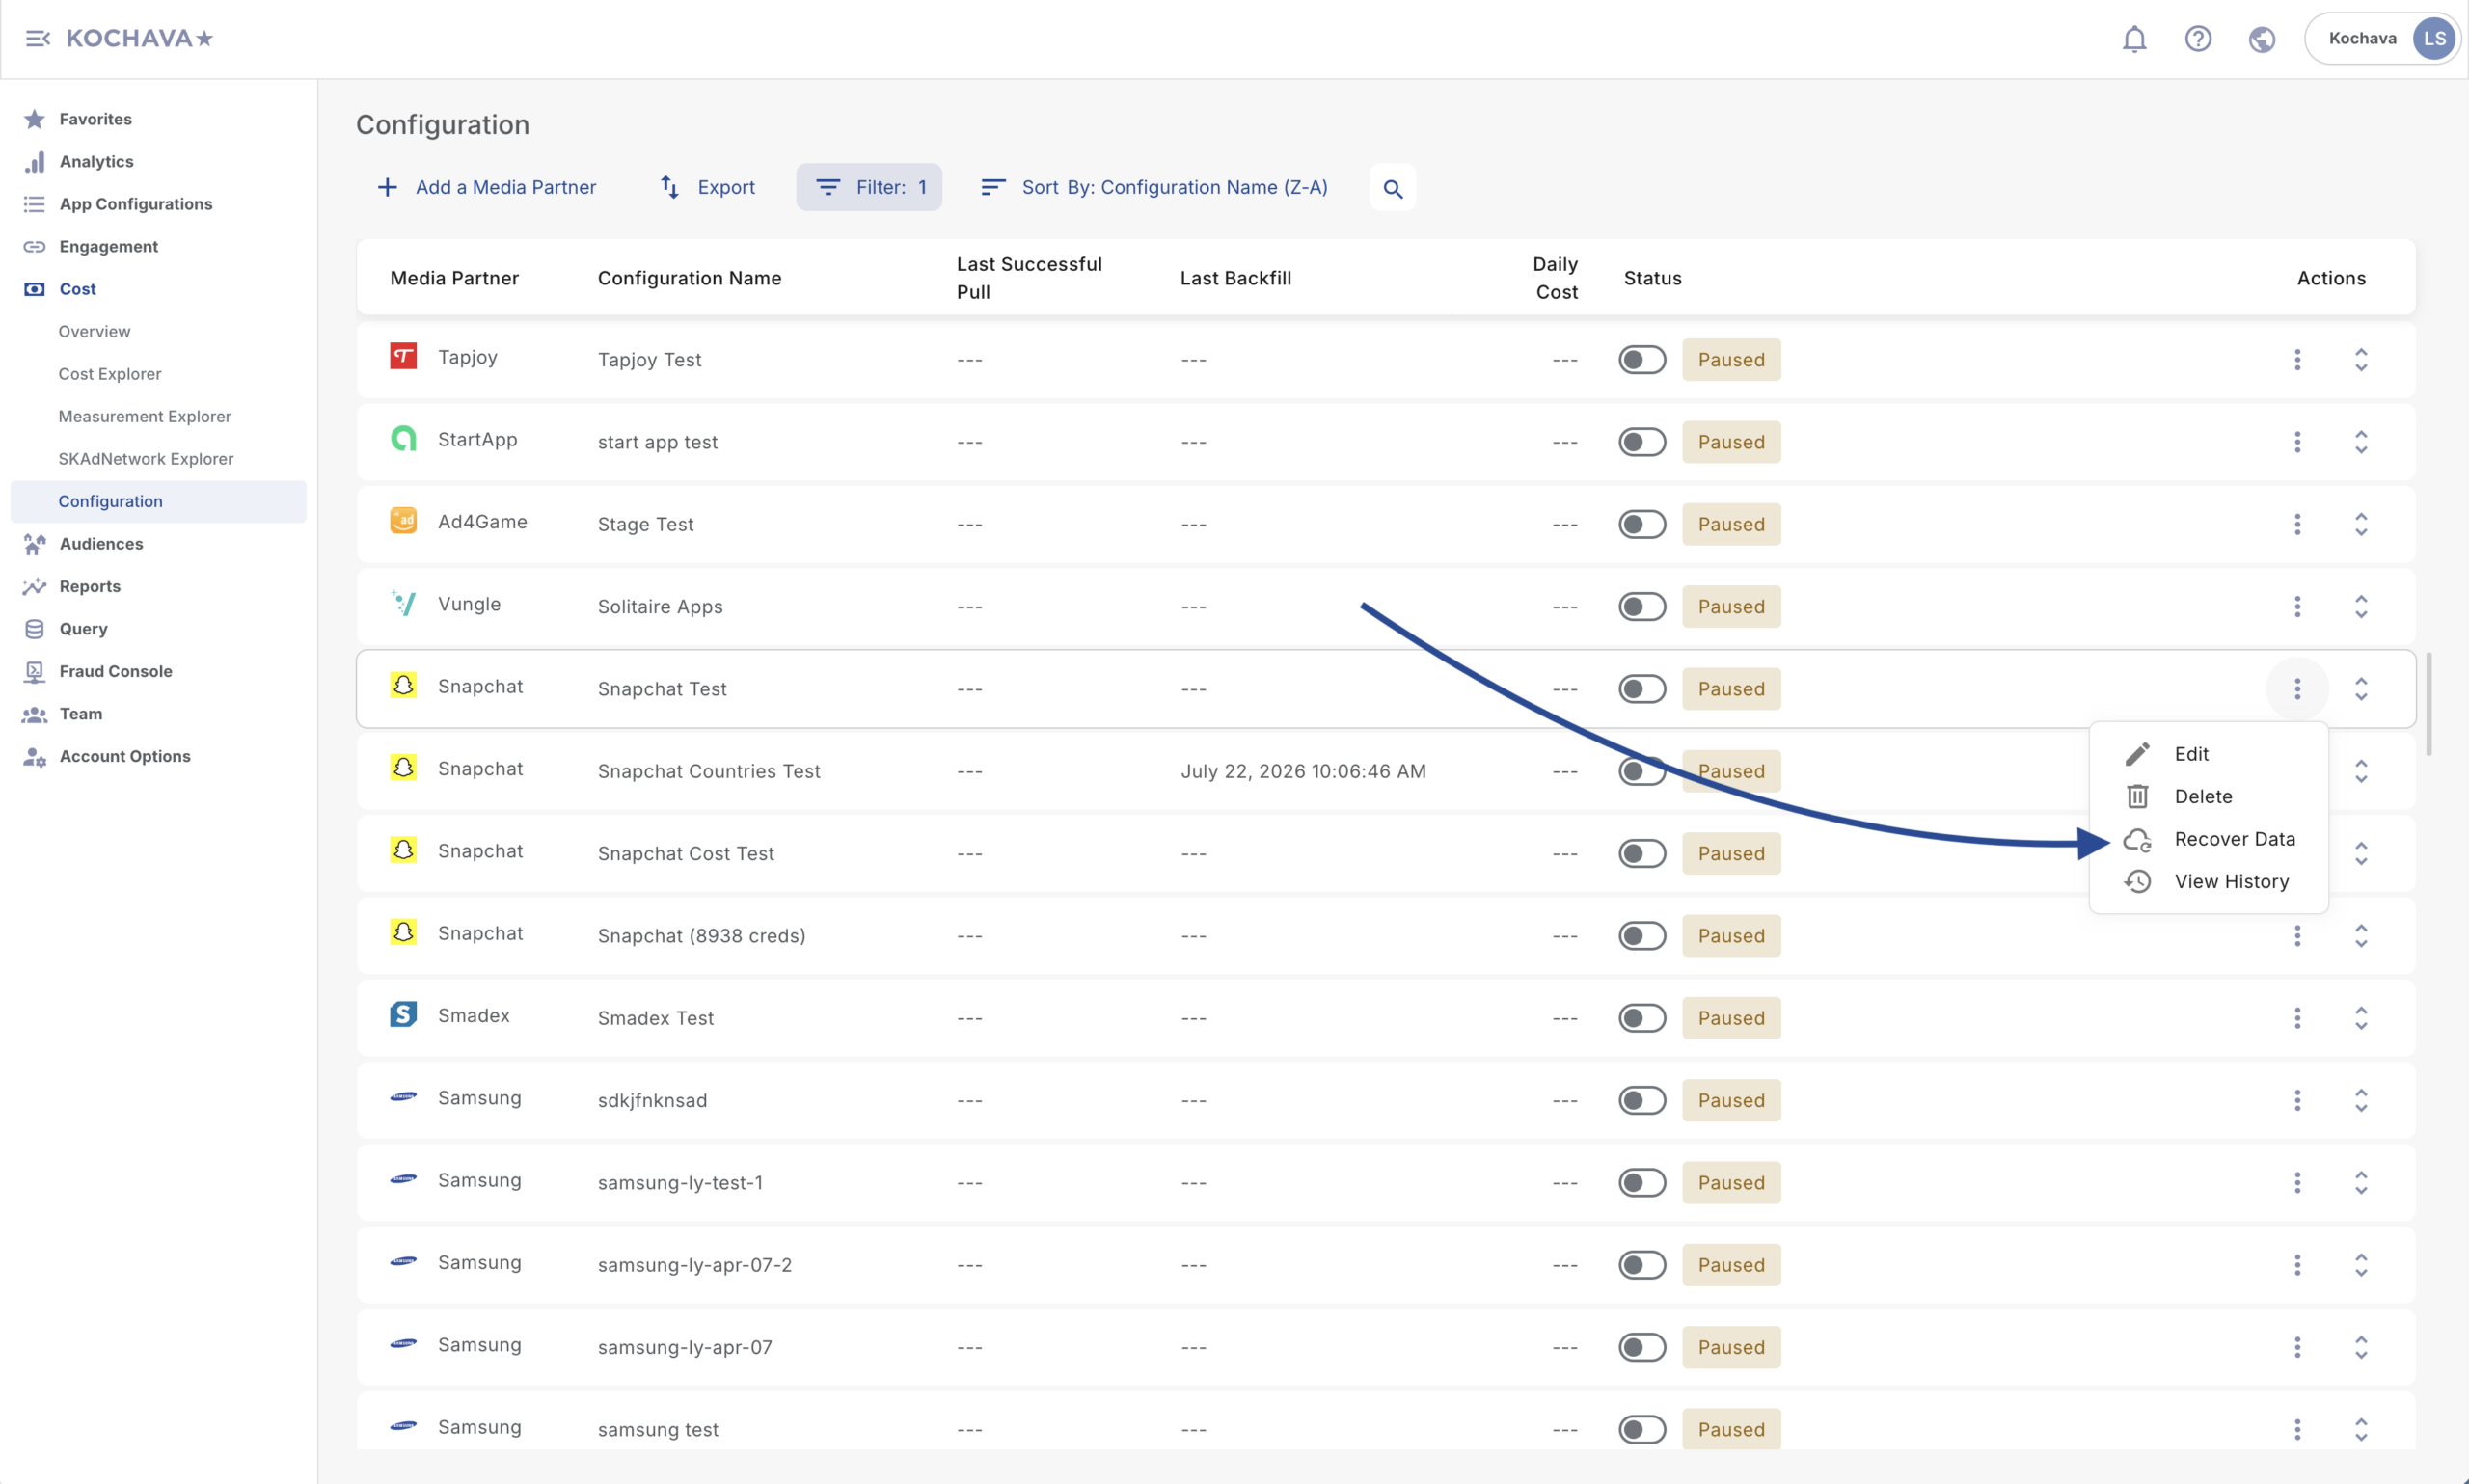
- Click the ⋮ menu on the right side of the row.
- Select Recover Data
- A Recovery Form opens in a side drawer.
- Select the date range you’d like to recover.
- The date picker only allows valid dates for that network — dates beyond the network’s retention limit are grayed out.
- The maximum recoverable range is one year back from today.
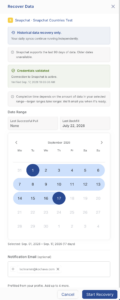
- (Optional) Add up to 4 additional email addresses to be notified when the job completes. Your own email is pre-filled.
- Click Submit.
The drawer closes and an inline banner appears on the integration row showing “Recovery in Progress.” You can close your browser — you’ll receive an email when the job completes, typically within 24 hours.
Starting a Recovery from a System Alert
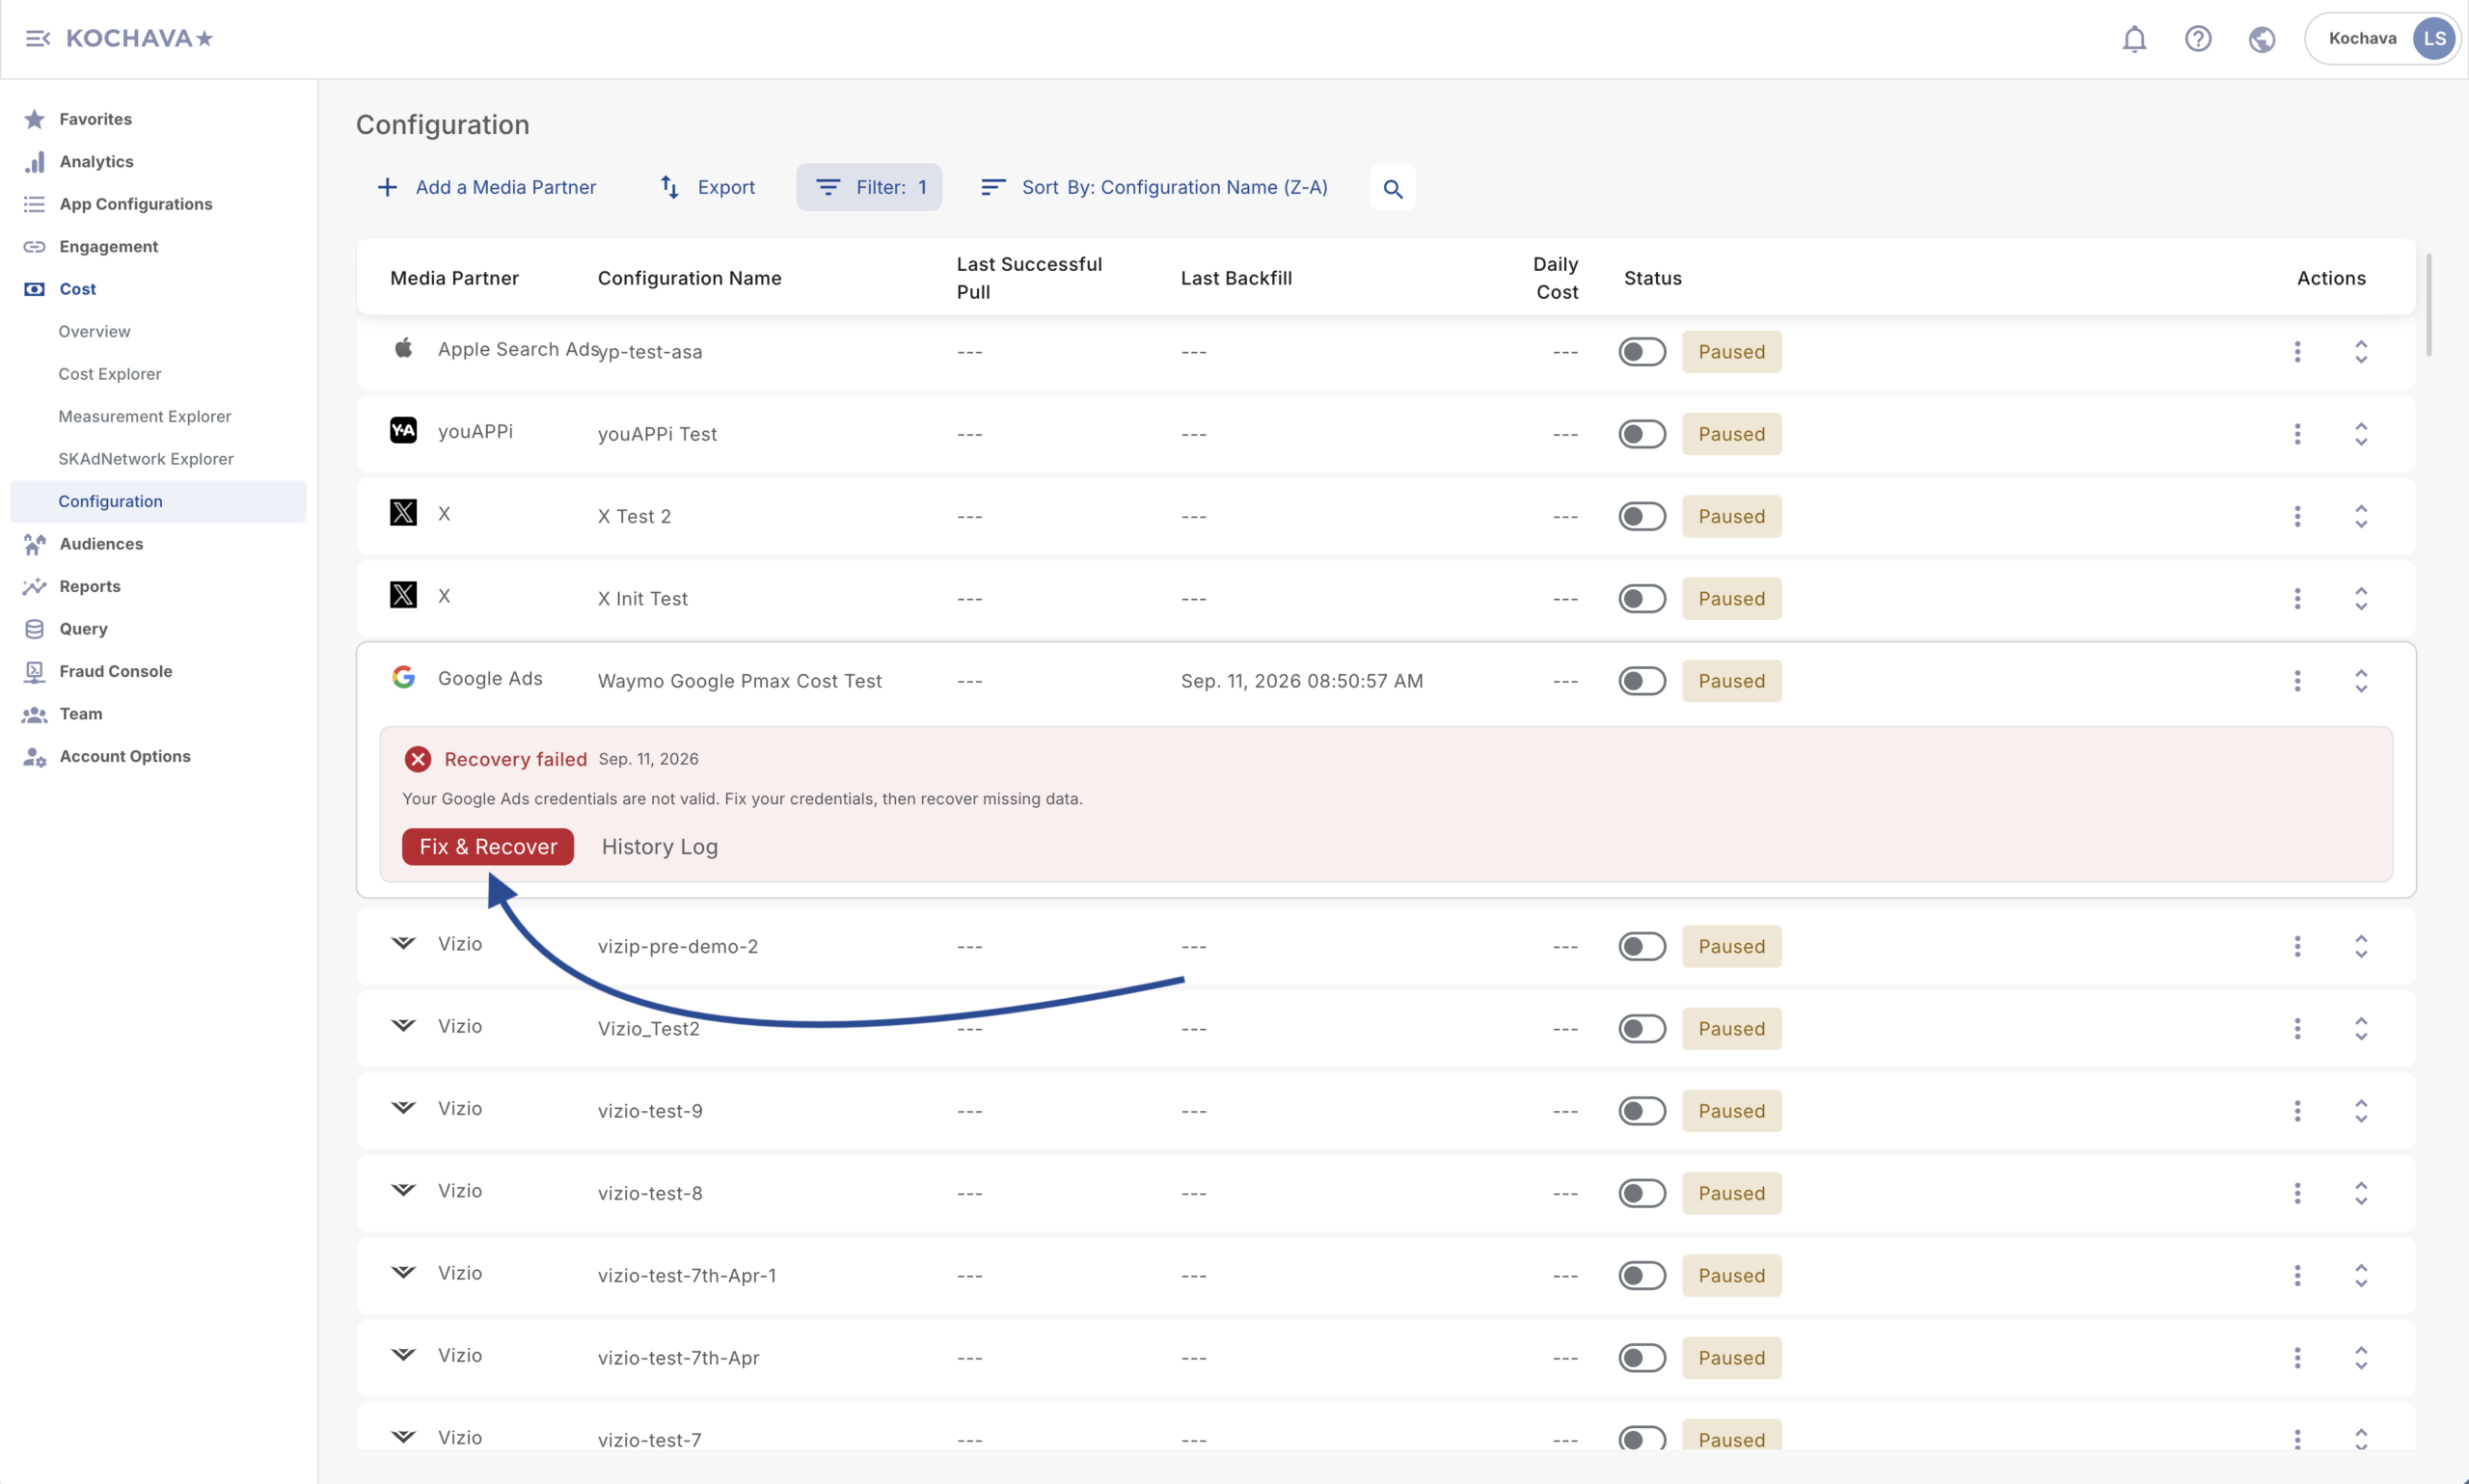
Kochava automatically monitors your integrations and will alert you directly on the Cost Configuration page if it detects a credential failure, job failure, partial results, or zero rows returned from a network.
- Navigate to the Cost Configuration page.
- Look for an inline banner on the affected integration row.
- Click the banner’s Fix & Recover button.
- The Recovery Form opens in a side drawer, with the date range pre-filled based on the gap that was detected. A notice in the drawer explains why the dates were pre-filled — you can adjust the range if needed.
- (Optional) Add additional notification email addresses.
- Click Submit.
Fix & Recover (For Partial or Failed Recoveries)
If a recovery job completes but some days couldn’t be recovered, the integration row will show a Partial banner. The banner displays:
- How many days were successfully recovered
- How many days remain missing
- A table grouping the unrecovered days by failure reason (for example, “Credential error: Mar 7–9, Mar 15”)
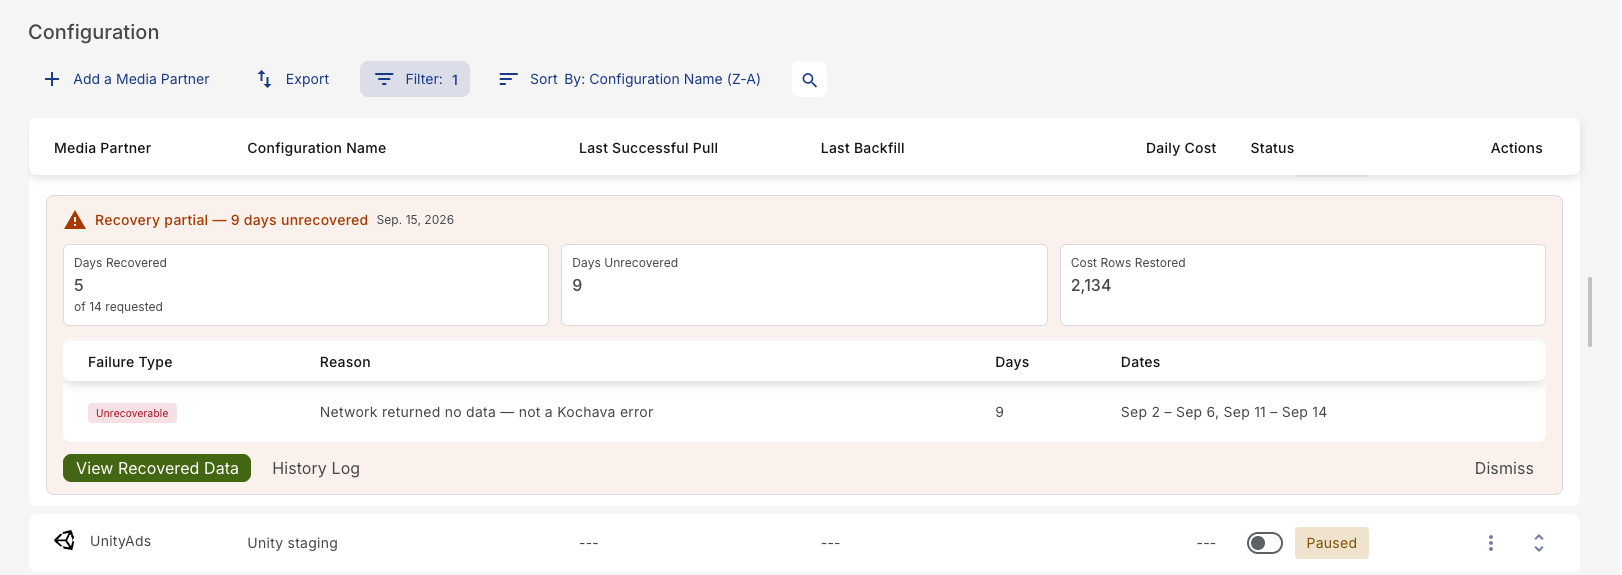
If the failure reason is fixable — such as an expired credential — a Fix & Recover button appears in the banner.
- Click Fix & Recover.
- A drawer opens and automatically runs a credentials check on the integration.
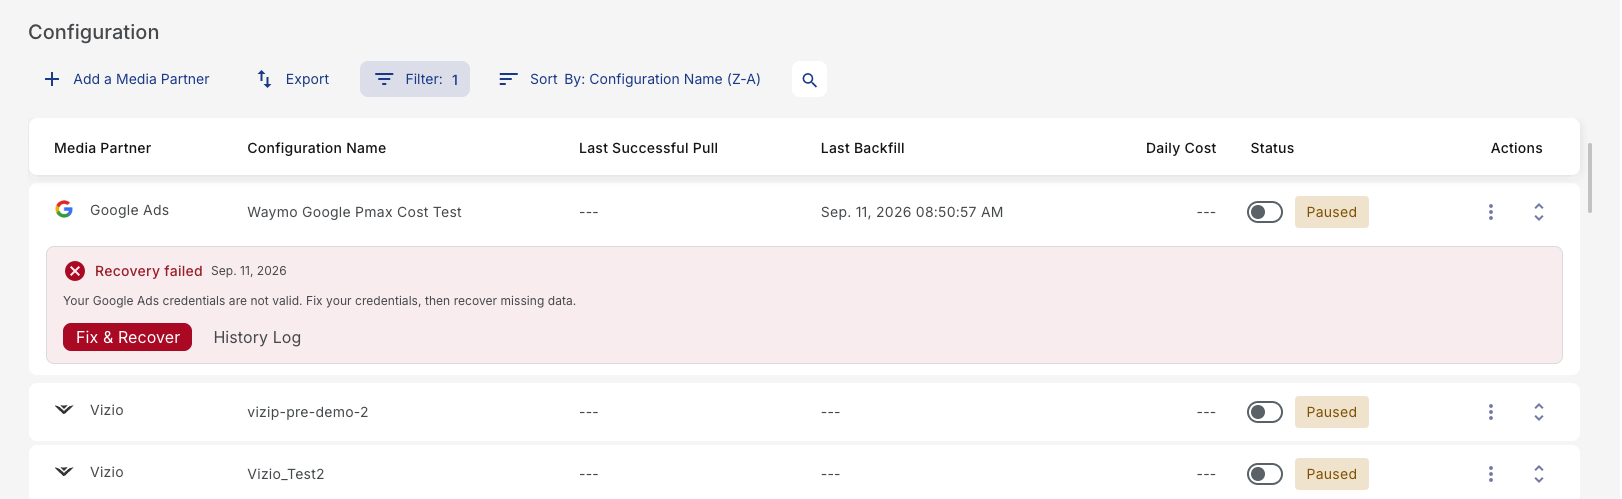
- If the credentials check passes: a retry form appears, pre-filled with only the days that failed the first time (not the entire original range).
- If the credentials check fails: an error message appears with resolution steps (for example, “Fix your credentials first”).
- If the credentials check passed, click Submit to retry only the missing days.
A new recovery job starts for just the unrecovered days. The original Partial job is preserved in the History Log for reference.
Viewing the Recovery History Log
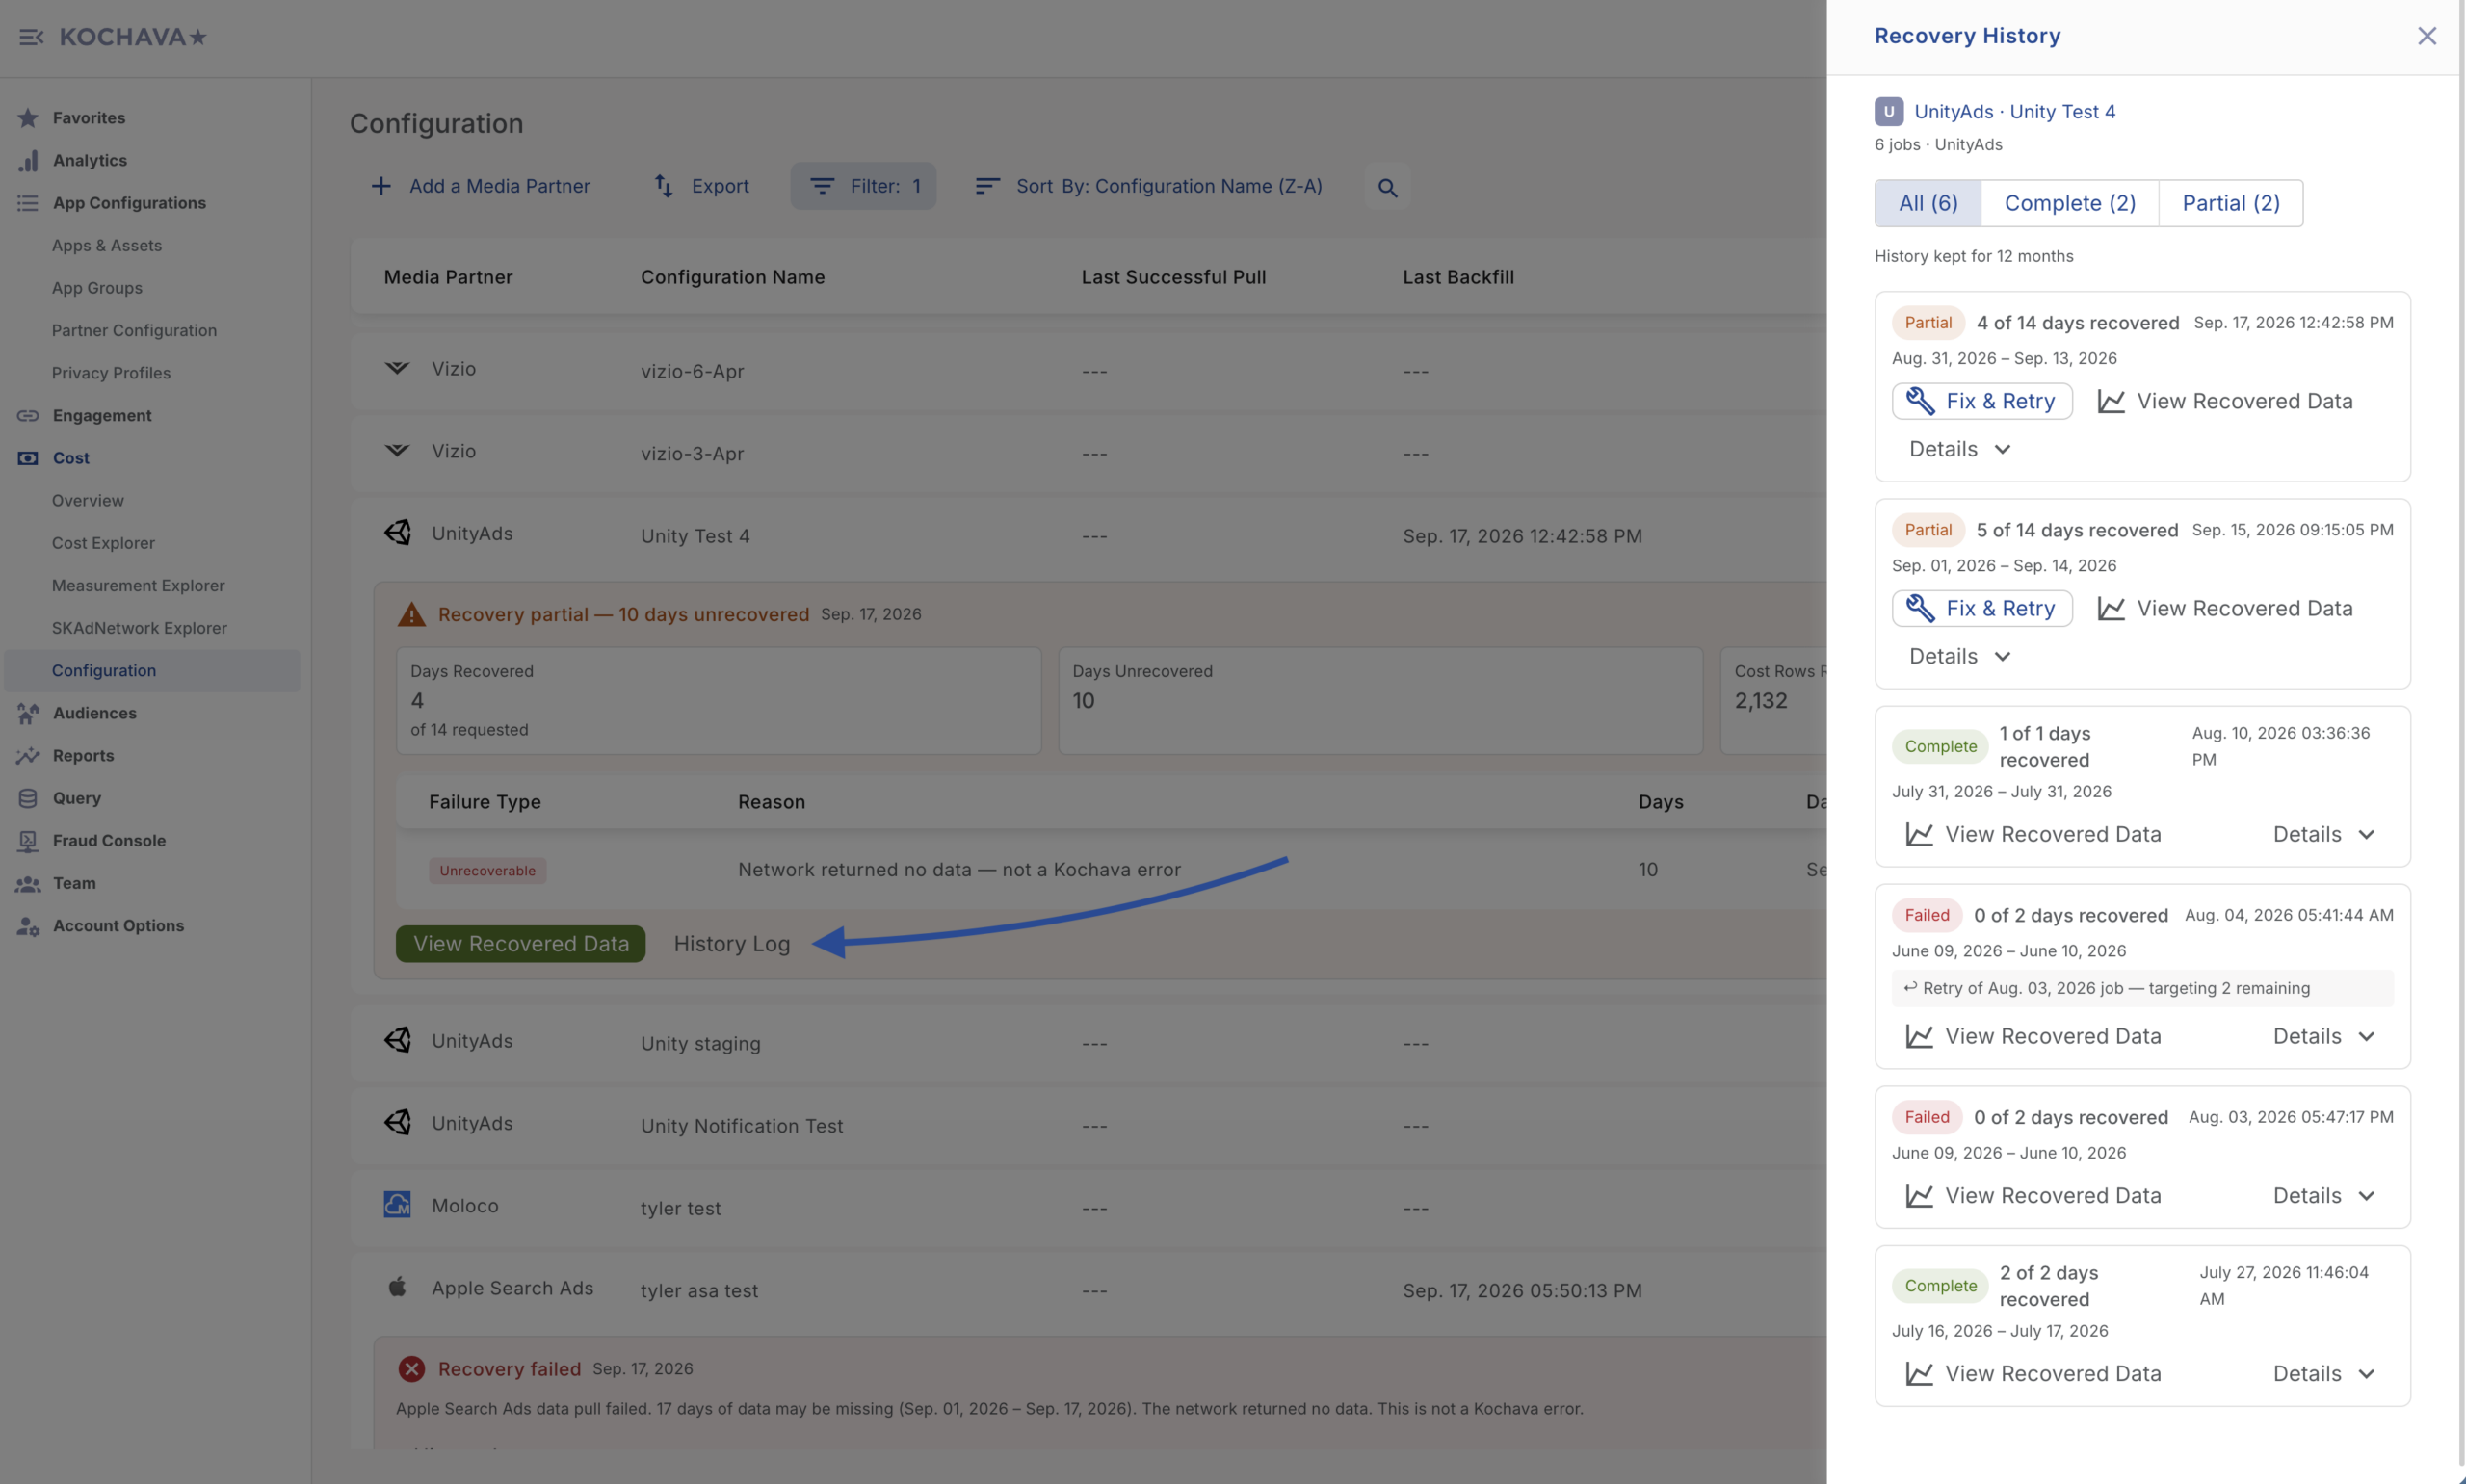
Each integration keeps its own log of past recovery jobs.
- On the Cost Configuration page, locate the integration row.
- Click the ⋮ menu.
- Select View History Log.
- A drawer opens showing all recovery jobs for that integration, newest first, including:
- Date range recovered
- Date the job was triggered
- Terminal status (Complete, Partial, or Failed)
- Days recovered vs. days unrecovered
- Failure reasons, if applicable
- Click any job card to expand it for full details. If a job was created via Fix & Retry, it will show a link back to its original parent job.
Dismissing an Alert Banner
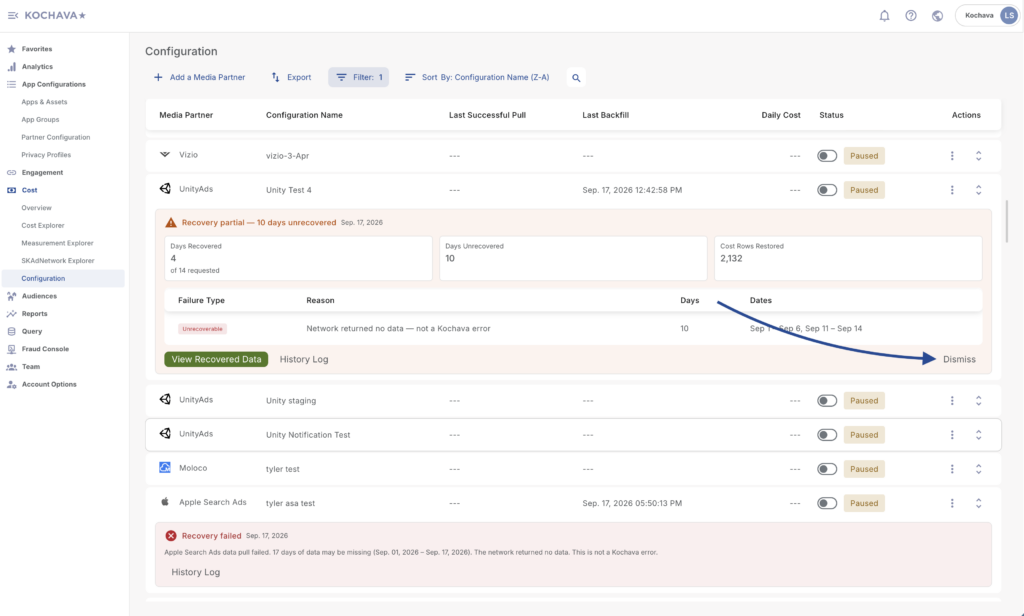
If you know a data gap is expected — for example, a campaign was intentionally paused during that period — you can dismiss certain alert banners without triggering a recovery.
Dismissible:
- Partial results (some days recovered, some not)
- Zero rows returned
Not dismissible (these indicate an active integration issue):
- Credentials failed
- Job failed
To dismiss a banner, click its Dismiss button. The banner disappears permanently for that specific gap (identified by integration + date range). If a new gap is later detected on the same integration, a new banner will appear — dismissal only applies to the specific gap, not the integration as a whole.
You can still trigger a manual recovery at any time via the ⋮ menu, even after dismissing a banner.
Verifying Recovered Data in Cost Explorer
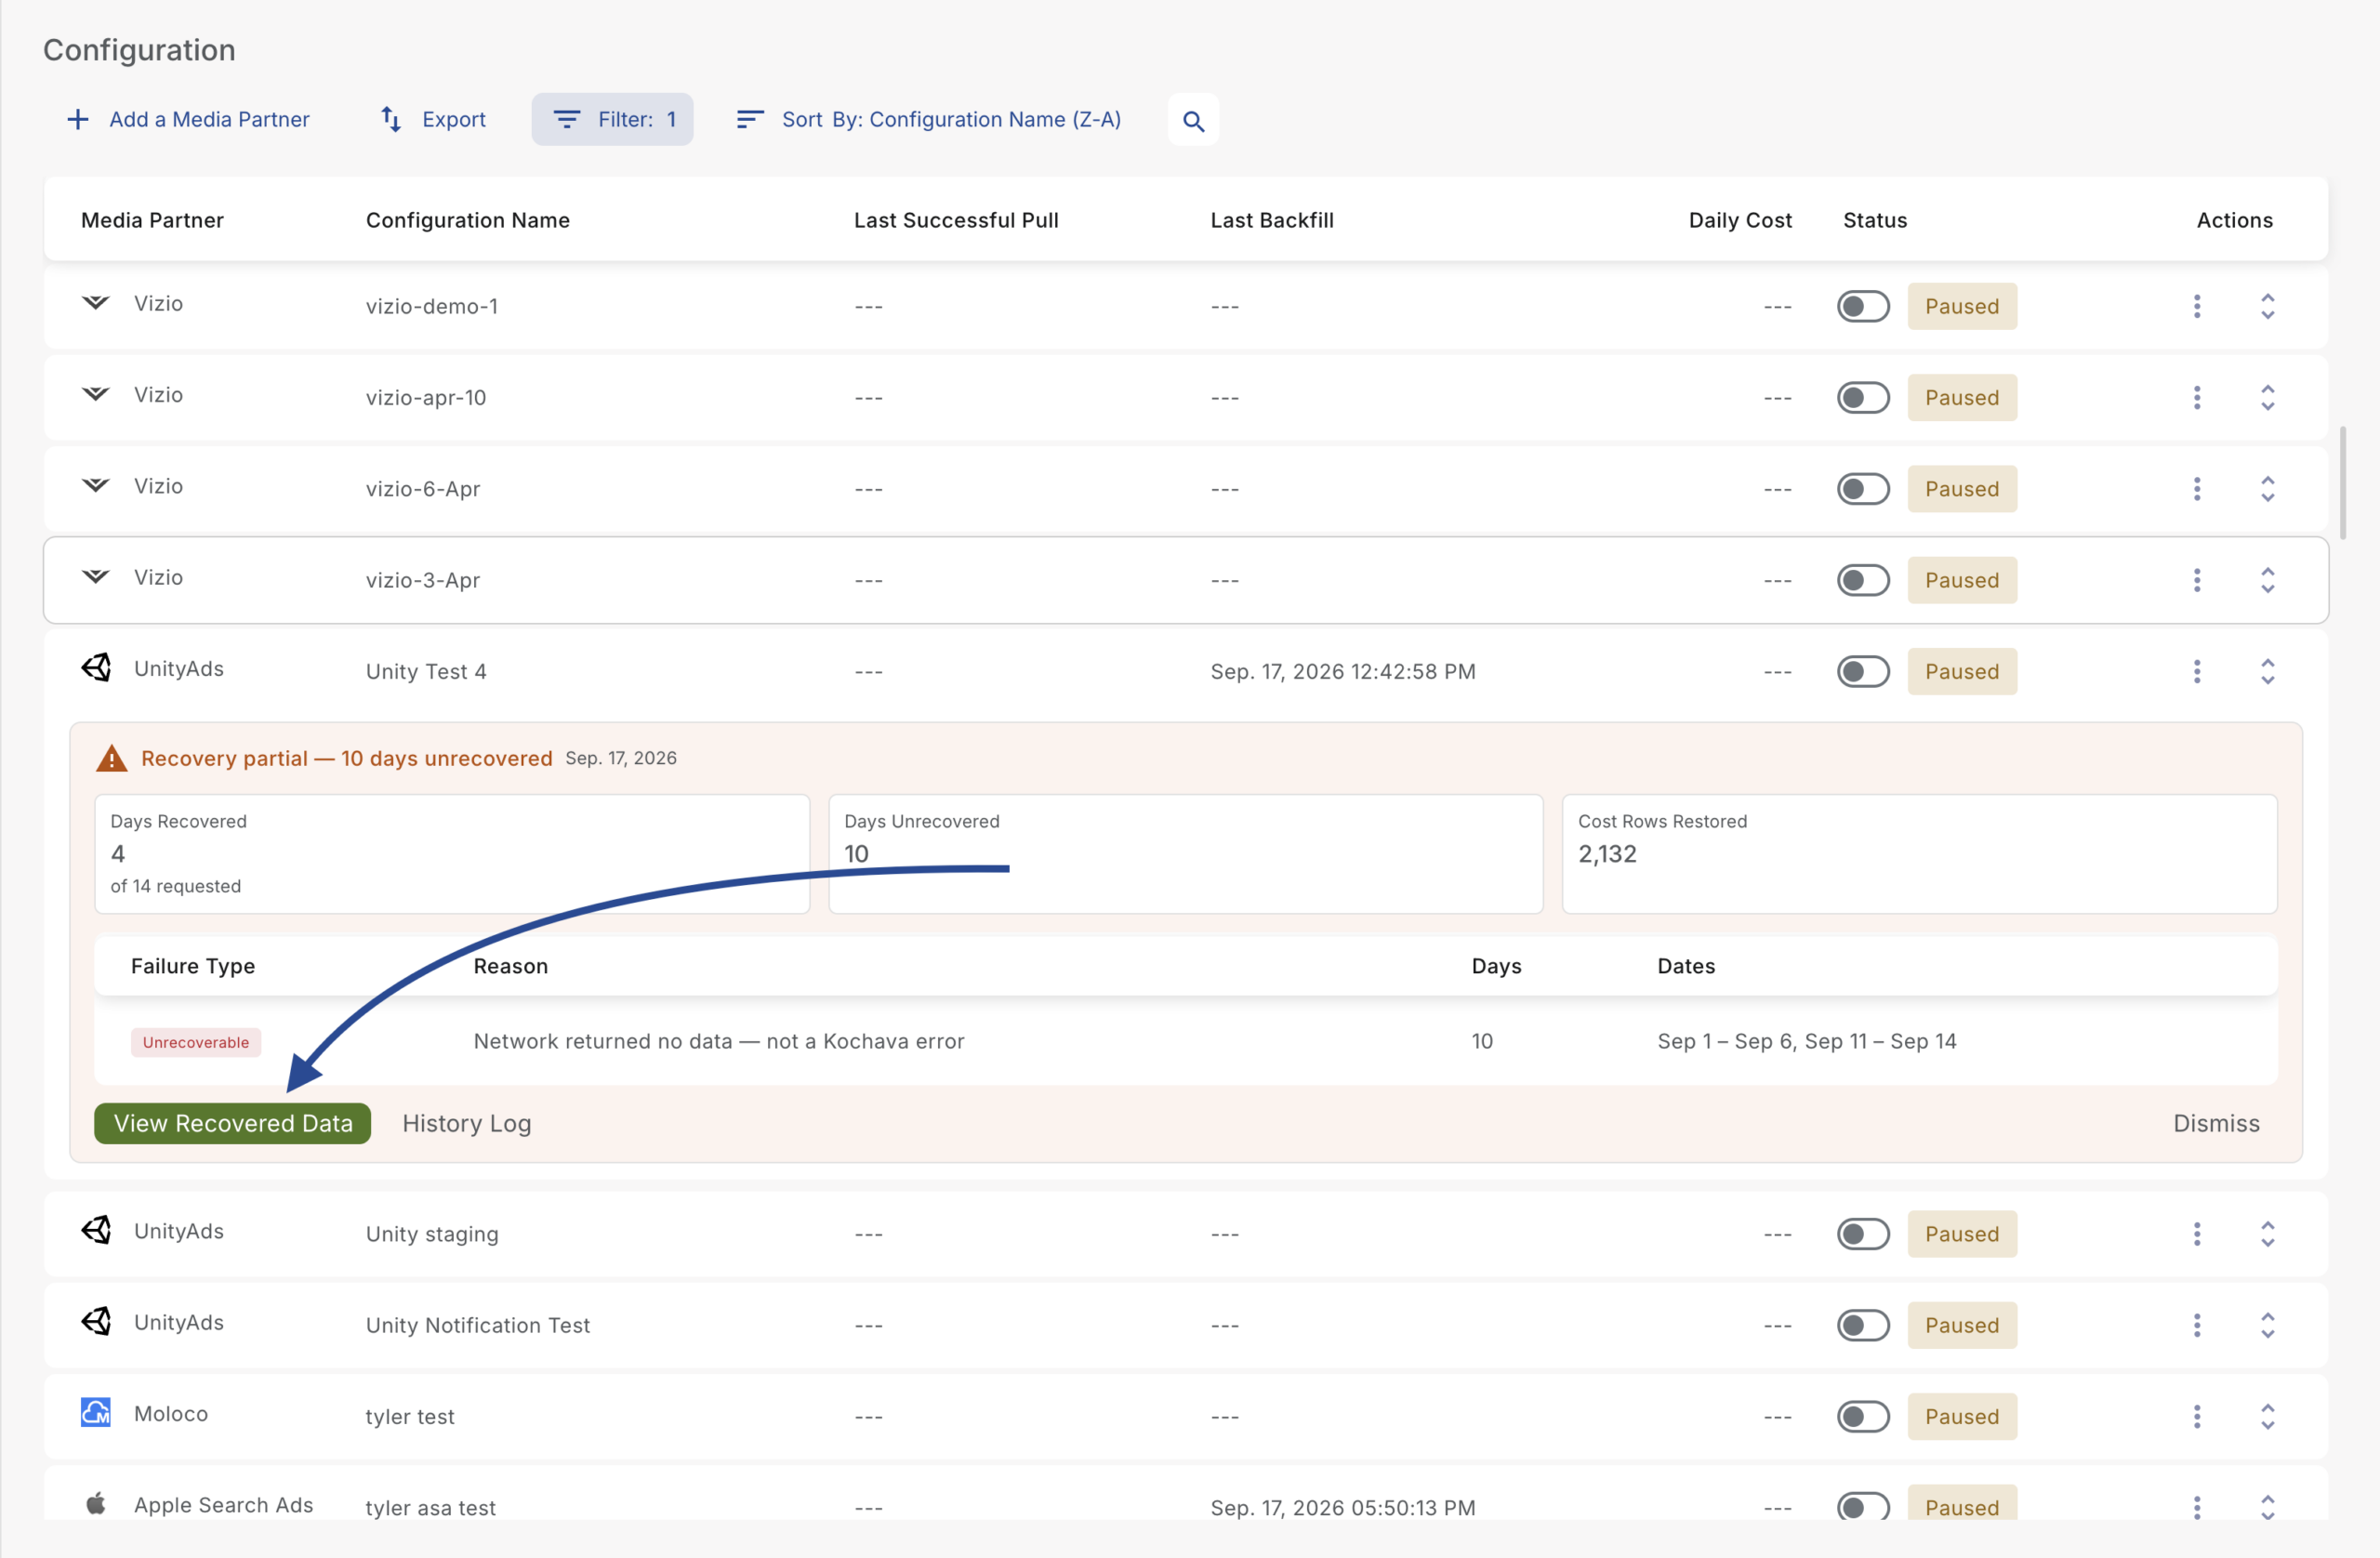
Once a recovery job reaches Complete or Partial status, you can verify the results directly.
- Locate the integration row with the Complete or Partial banner.
- Click View Recovered Data.
- You’ll be navigated to Cost Explorer.
Understanding Job Status
| Status | Meaning | Where You’ll See It | What You Can Do |
|---|---|---|---|
| In Progress | Job is actively recovering data | Progress pill in the Status column (“Recovery in progress · Day N of M”) plus inline banner | Wait; you can close your browser — you’ll get an email when it’s done |
| Complete | All requested days were recovered | Green banner: “Recovery complete — [N] days recovered. View Data.” | Click View Recovered Data to verify in Cost Explorer |
| Partial | Some days recovered, some not | Amber banner: “[N] days unrecovered. View Result or Fix & Retry.” | Review the failure table; use Fix & Retry if applicable |
| Failed | Job could not run at all | Red banner: “Recovery could not complete. [Reason]. View details.” | Review the error, resolve the issue, then trigger a new recovery manually |
Frequently Asked Questions
Does recovery affect my daily cost syncs?
No. Recovery runs as a low-priority background job and does not interfere with your scheduled daily cost pulls. You’ll see a “Daily syncs unaffected” note throughout the recovery flow.
Can I run multiple recoveries at the same time on the same integration?
No. Only one active recovery job is allowed per integration at a time. While a job is Queued or In Progress, the Recover Data menu option is disabled until it finishes.
What happens if I recover data for dates that already have data?
Recovery restates the existing data with whatever the network currently returns — no duplicate records are created. This works the same way as the existing 7-day restatement window.
What’s the maximum amount of data I can recover?
- Up to one year back from today, per request.
- Each network also has its own API data retention limit (see table below). The date picker enforces whichever limit is tighter.
- Data older than the network’s retention limit, or older than one year, is permanently unrecoverable — this is a limitation of the ad network’s API, not Kochava.
Can I recover data for flat-file networks (LG, Roku, Samsung, Vizio, Mooko)?
No. Cost Data Recovery only supports API-based network integrations.
Network Recovery Windows
| Network | Network’s Maximum Lookback | Effective Recovery Limit |
|---|---|---|
| AppLovin | 45 days | 45 days (network limit applies) |
| Apple Search Ads | 90 days | 90 days (network limit applies) |
| Snapchat | 90 days | 90 days (network limit applies) |
| Moloco | 90 days | 90 days (network limit applies) |
| Facebook (Meta) | 13 months (~395 days) | 1 year / 365 days (Kochava cap applies) |
| Google Ads | ~36 months | 1 year / 365 days (Kochava cap applies) |
| TikTok | ≥ 1 year | 1 year / 365 days (Kochava cap applies) |
| Liftoff | Since Jan 1, 2018 | 1 year / 365 days (Kochava cap applies) |
| Unity | TBD | Capped at 1 year, pending confirmation |
| ironSource | TBD | Capped at 1 year, pending confirmation |
Kochava supports recovery back to each network’s API retention limit, up to a maximum of one year per request. The date picker in the Recovery Form automatically enforces whichever limit is more restrictive for the selected network.